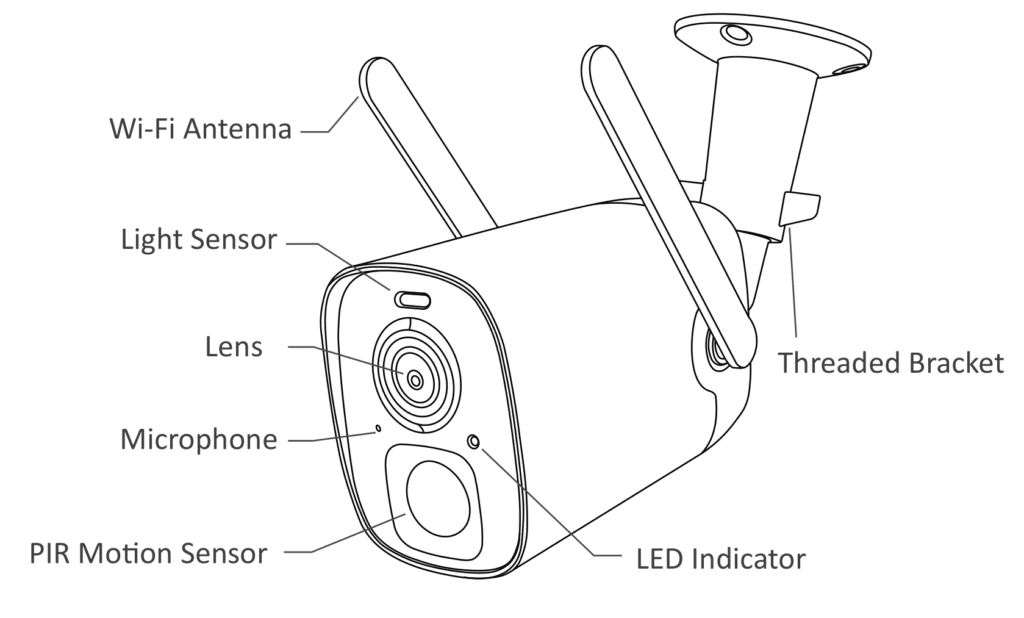
Camera Structure

Installing a Micro SD Card in Your Smart Battery Camera
The Smart Battery Camera includes a built-in card slot that supports up to 128GB Micro SD cards. Follow these steps to install your Micro SD card correctly:
- Power Off and Access: Ensure your smart battery camera is powered off. Gently pull open the silicone cover to access the card slot.
- Insert the Micro SD Card: Carefully open the silicone cover further if needed and insert the Micro SD card into the slot. Make sure to align the card according to the direction indicated on the memory card itself.
- Seal the Slot: After inserting the card, push the silicone cover back into place to protect the card and the internal components of the camera.
Important Warning Regarding FCC Compliance
This equipment has been tested and found to comply with the limits for a Class B digital device, pursuant to Part 15 of the FCC Rules. These rules are designed to provide reasonable protection against harmful interference in a commercial environment.
- Operational Caution: If this equipment is not installed and used according to the instructions, it may cause harmful interference to radio communications. The antennas should be installed such that a minimum distance of 20 cm is maintained from all persons, and the equipment must not be co-located or operating in conjunction with any other antenna or transmitter.
- Legal Restriction on Eavesdropping: Under FCC Rule 15.9, it is prohibited to use this device for the unauthorized interception of private conversations. Such activity is allowed only if conducted under lawful authority and with the consent of all parties involved.
Accessories

Battery Charging
The batteries inside the camera are not fully charged according to transportation safety regulations. Please charge the batteries using a USB cable (5V adapter not included). The LED Indicator will be in solid yellow when charging, and will turn to solid green when it is fully charged. It takes about 8-10 hours to fully charge your camera.

LED Indicator Information
To Turn On the Camera:
Press the Power Button on the bottom of the camera to turn it on. Then the LED Indicator in the front of the camera will be solid blue.
To Turn Off the Camera:
Press the Power Button on the bottom of the camera to turn it off. Then the LED Indicator in the front of the camera will be off.
LED Indicator Guide
| LED Indicator | Description |
|---|---|
| Solid Blue | Working |
| None | Sleep/Power Off |
| Solid Yellow | Charging |
| Solid Green | Charging Finished |
Download App
Download the VicoHome App from the APP Store or Google Play. You can also download the App by scanning the QR code above with the QR code scanner on your smartphone.

Wi-Fi Set Up
Before you start the Wi-Fi configuration, please note the following:
- The Battery camera works with 2.4 GHz Wi-Fi but not with 5 GHz Wi-Fi.
- Avoid using special characters or symbols like (@~!#$%&*…) in your Wi-Fi name or password.
- Perform the configuration near your Wi-Fi router.
Launch the “VicoHome” app and register for an account using your mobile phone number or email ID.
Run A Test
After setup, tap on the live view window in the app for a test. Then take your Battery camera outside to the installation spot and run a test there. Make sure the installation spot is covered by strong 2.4 GHz Wi-Fi signal. If the battery camera doesn’t work well outside, you may need to move the router closer to the installation spot or invest in a Wi-Fi extender.
Installation Guide
Find a Good Installation Spot
- Height of installation from the ground is suggested around 2.2-3.5M (~7.2-11.5 Feet)
- PIR (motion sensor) setting for lighting on/off automatically is around 10M (30 Feet).
- Make sure the camera’s sight is not blocked.

Bracket Installation Method
- Use the provided drilling template to mark the position of holes on your wall.
- Use drill bit (15/64”, 6mm) to drill three holes.
- Install anchors to fix the screws.
- Install the Threaded Bracket on your wall with the screws provided.
- Rotate the camera clockwise to install it on the Threaded Bracket.
- Rotate nut on the bracket counterclockwise to loosen and adjust the camera angle to cover the surveillance area.
- Tighten the thread bracket clockwise. Make sure the camera is within Wi-Fi range.


Share Your Device
Steps: Run VicoHome App >> Home >> Share >> Camera sharing >> Use a mobile device to scan the QR code, sharing success.
Technical Specifications
Video & Audio
- Image Sensor: 1/2.9″ color CMOS Sensor
- Image Resolution: 1920 x 1080 px
- Lens: 2.8mm(3MP), F2.0, Angle of view:110°
- Minimum Illumination: 0.01 Lux
- Video Compression: H.264/H.265
- Audio Input/Output: 2-way audio with noise cancellation
- Audio Compression: AAC
Network
- Wireless Network: 2.4G Wi-Fi (IEEE802.11b/g/n), built-in antenna(3dB)
- Supportable Protocol: TCP/IP, UDP/IP, DHCP, RTMP, MUTP
- Supportable IP Address: Dynamic IP address supported
Storage
- Storage Type: Micro SD Card(Max 128G)
- Cloud storage: Support
- Recording: Triggered by PIR motion sensor
- Wake-up: PIR body induction wake-up, and remote positive wake-up
- Alarm: Alarm push by mobile APP and alarm sound
- AI: Human contour detection, activity zone, intelligent push, pet snapshot, Package inspection
Software
- App Name: VicoHome
- System: IOS, Android
Power Consumption
- Battery Capacity: 9600mAh
- Standby Power Consumption: 1.68mW (4V 0.42mA)
- Power Consumption of The Daytime Operation: 0.88W (4V 220mA)
- Power Consumption of Operation at Night: 2.20W (4V 550mA)
- Battery Life: 6 months (provided that 20 10s videos are recorded per day)
- Standby Time: 1 year
General
- Battery Charging: DC 5V 1A-2A (Micro USB Port)
- Dustproof and waterproof: IP65
- Operating Environment: -10 ~ 45°C / 10% ~ 80% (no condensation)
- Storage Environment: -20°C ~ 60° / 0% ~ 90% (no condensation)
- Size: 117mm x 74mm x 75mm (without bracket)
- Weight: 0.318KG
Frequently Asked Questions
Q1: Why doesn’t the Wi-Fi name appear when I connect to Wi-Fi?
A1: You need to turn on the “location permission” for the app in the system settings and change it to “allow when using”.
Q2: Will the camera show red lights when night vision is activated?
A2: The built-in infrared lamp beads make the camera only show some dim red lights when night vision is activated, but the image quality is still clear under no light environment.
Q3: What are the requirements for Wi-Fi?
A3: Please use a 2.4GHz wireless network. The device does not support the 5GHz wireless network. Meanwhile, please set the Wi-Fi authentication method to WPA2-PSK or another low level of security method. A password is required.
Q4: How far should the camera be placed from the router?
A4: After testing, the Wi-Fi connection distance can normally reach up to 100 meters in the open area. However, the actual situation depends on the strength of Wi-Fi and its surrounding environment.
Q5: What is the maximum length of recording time?
A5: You can select the recording time in the application or “automatic” mode, recording time depending on the person. The maximum length of the video is 20 seconds.
Q6: How to invite family and friends to use my camera together?
A6: Please refer to the guiding steps on page 8 of this user guide.
Q7: Whether the device has cloud storage?
A7: Cloud storage is free of charge for 30 days after the successful addition of the device. After 30 days, you will be charged. The specific cost is explained in the APP.
Q8: What should I do when the device is in malfunction?
A8: Long press the power button to restart the camera. In the case of a stuck machine, use a pointed object to press the reset button to force the device to restart and initialize the factory settings.