Thanks for purchasing and using our product. Please read this quick start guide before using it, and keep it for future reference.
Manual contents are subject to change without notice in accordance with our policy of continuous product improvement.
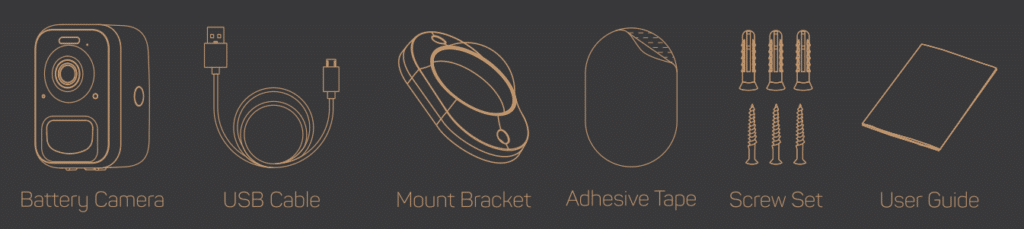
1. What’s in the Box
2. Camera Diagram
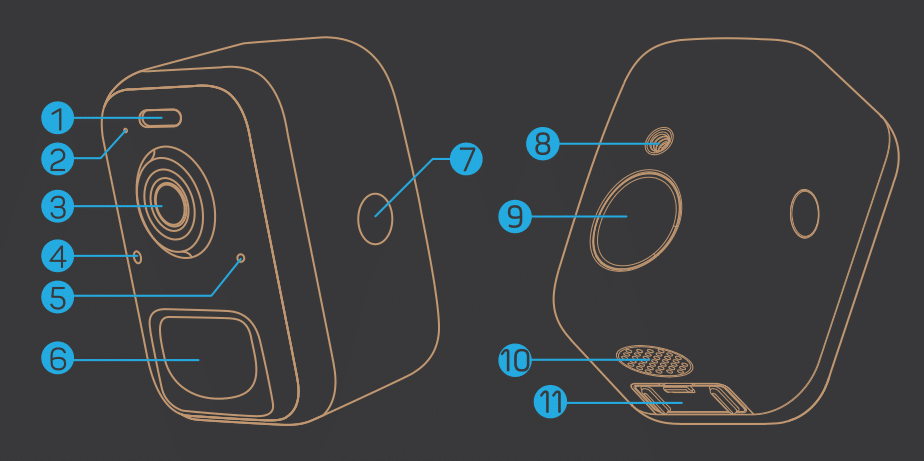
- LED Light
- Microphone
- 2MP Camera
- Ambient Light Sensor
- LED Indicator
- PIR Motion Sensor
- Back Shell Open Button
- Threaded Bracket Interface
- Strong Magnetic Chuck
- Speaker
- Power button & Micro USB Port
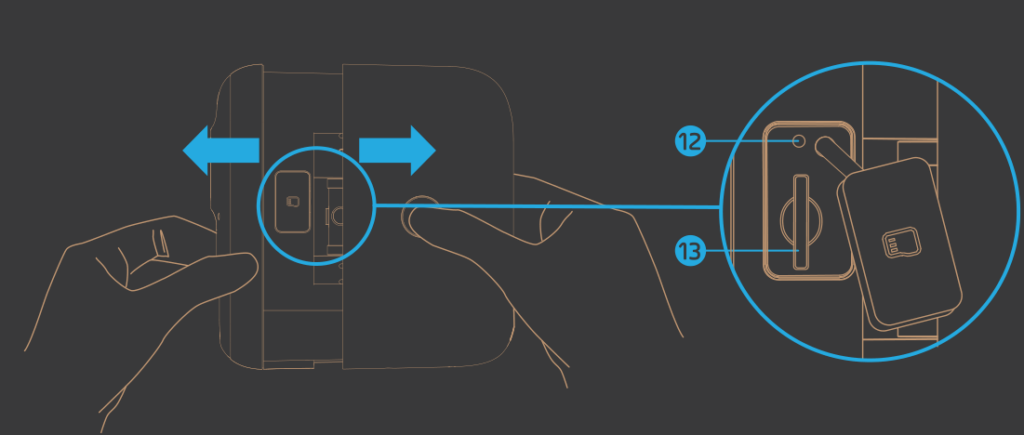
- Reset hole
- TF-card Slot
3. Battery Charging
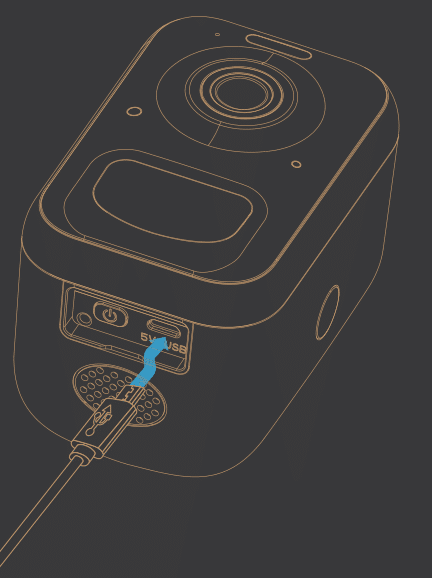
The batteries inside the Battery camera are not fully charged in accordance with transportation safety regulations. Please charge the batteries with a USB Cable (5V adapter not included), and fully charge for 8-10 hours before installation.
NOTE: The charging LED will be in solid red when charging and will turn to solid blue when it is fully charged.
4. Download the App

Download and install the ‘Vichome’ app from Google Play™ or the App Store™. The app is also available by scanning the QR codes on the right using your smartphone’s QR code scanner.
NOTE: Google Play™ is a trademark of Google Inc. App Store™ is a service mark of Apple Inc.
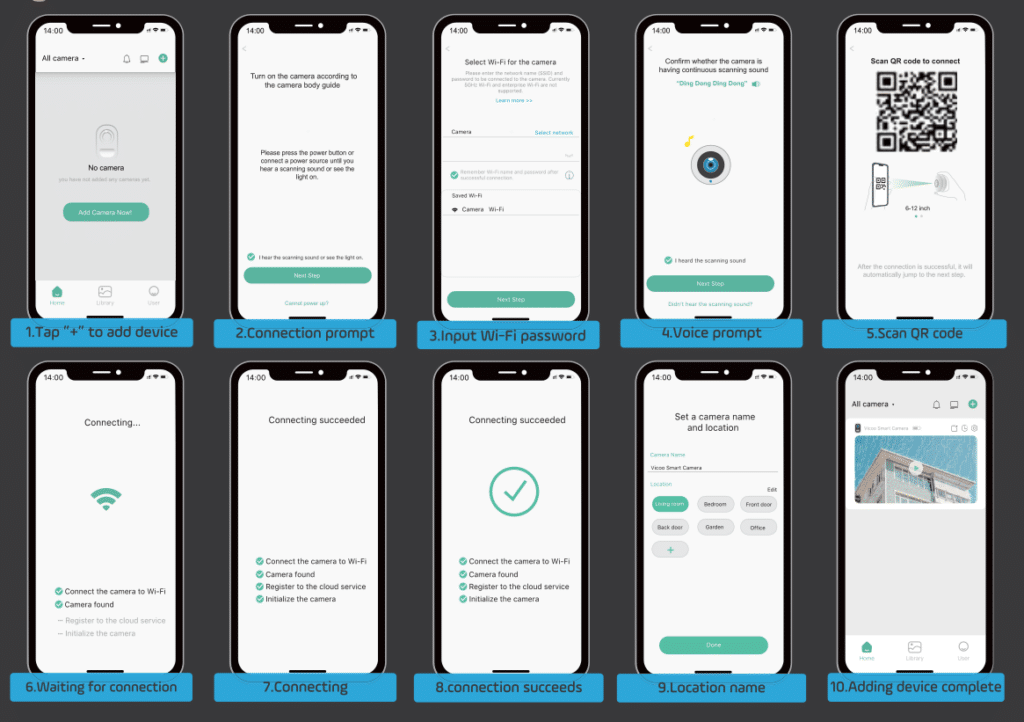
5. Wi-Fi Set Up
Before you start the Wi-Fi configuration, please note the following:
- The Battery camera works with 2.4 GHz Wi-Fi but not with 5 GHz Wi-Fi.
- Avoid using special characters or symbols like (@~!#$%^&*,,,) in your Wi-Fi name or password.
- Perform the configuration near your Wi-Fi router.
Launch the “Vichome” app and register for an account using your mobile phone number or email ID. Start the Wi-Fi configuration by following the in-app instructions or referring to the following guiding steps.
Guiding STEPS:
6. Run a Test
After setup, tap on the live view window in the app for a test. Then, take your Battery camera outside to the installation spot and run a test there. Make sure the installation spot is covered by a strong 2.4 GHz Wi-Fi signal. If the battery camera doesn’t work well outside, you may need to move the router closer to the installation spot or invest in a Wi-Fi extender.
7. Live View Interface
Main Menu Options:
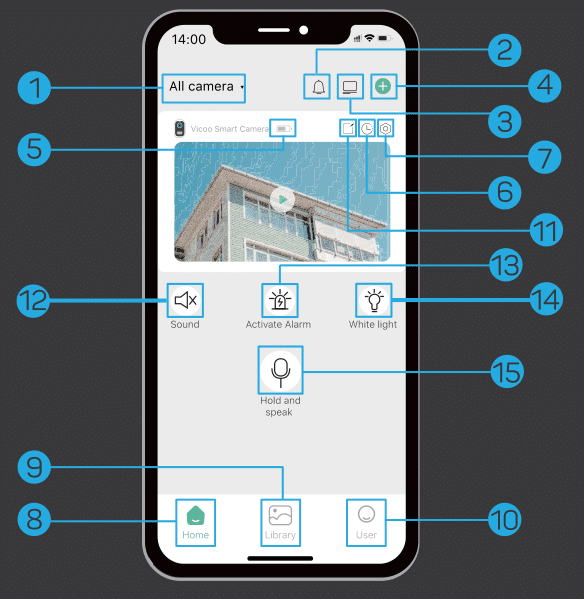
- Change Camera
- Mute Notification
- Window Layout
- Add New Devices
- Battery Status
- Playback
- Settings
- Home Page
- Photo Gallery
- User Info
- Sharing
- Sounds
- Alarm
- Light
- Speak
Live View Controls:
- Quit Live View
- Record Video
- Screenshot
- Audio On/Off
- WiFi Speed
- SD/HD
- Settings
- Speak
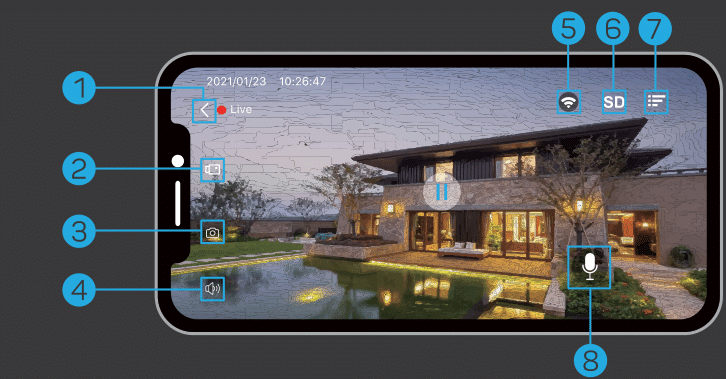
NOTE: Live viewing will not trigger device recording.
8. Playback
If the Micro-SD card is properly installed, you can playback the video clips taken after motion detection. A 7-day-rolling free cloud storage service is ready for your camera. You can also upgrade your cloud service pack in the settings.
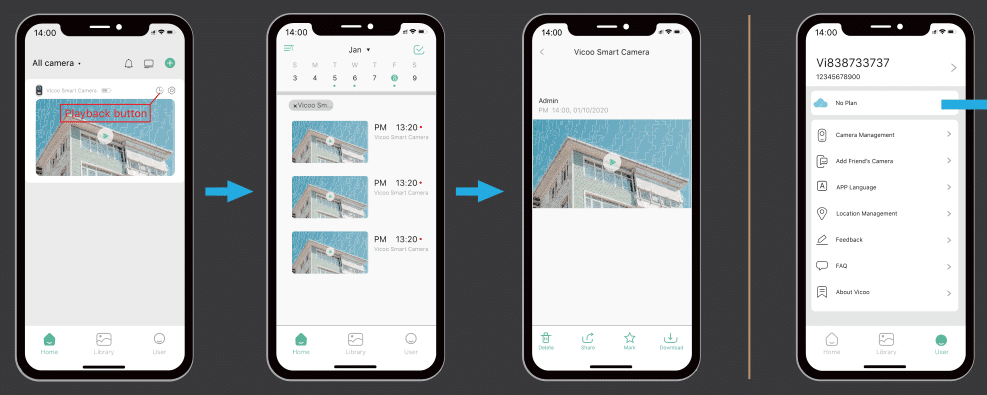
Tap to upgrade your cloud recording service pack and enable Smart AI Motion Detection area customization.
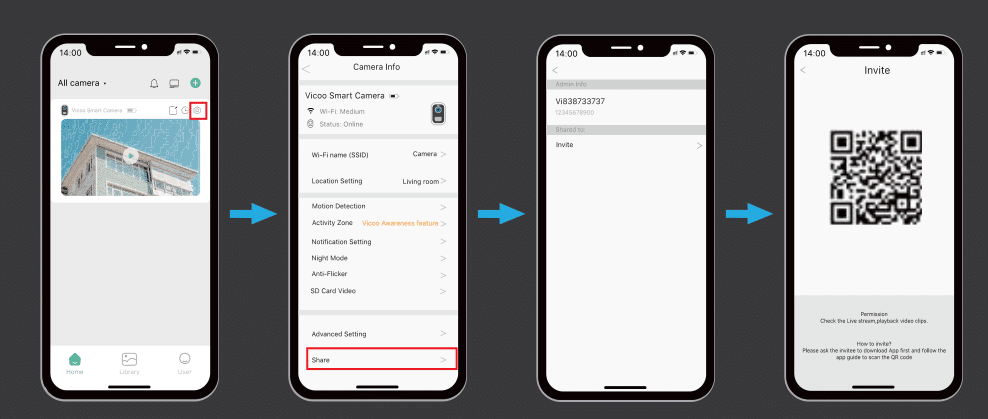
9. Share Your Device
Steps: Run Vichome App >> Home >> Invite >> My QR Code >> Let the administrator scan your QR Code.
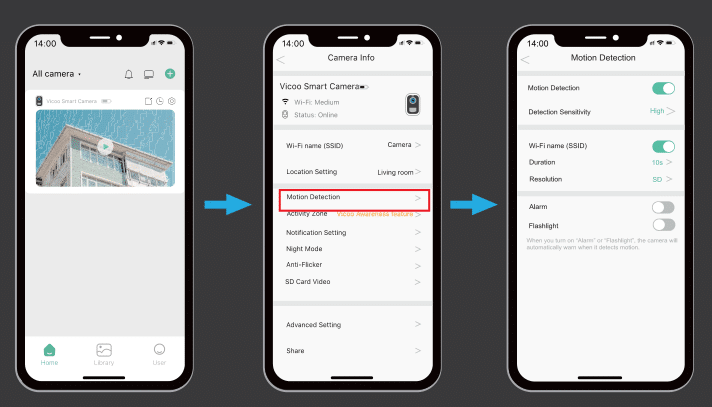
10. Alarm Setting
When your camera detects a motion, you will receive an alarm notification from the app. You can also enable flashlight alarms and siren alarms to be triggered after motion events. The flashlight alarm and siren alarm can also be triggered manually in the camera settings.
11. Installation
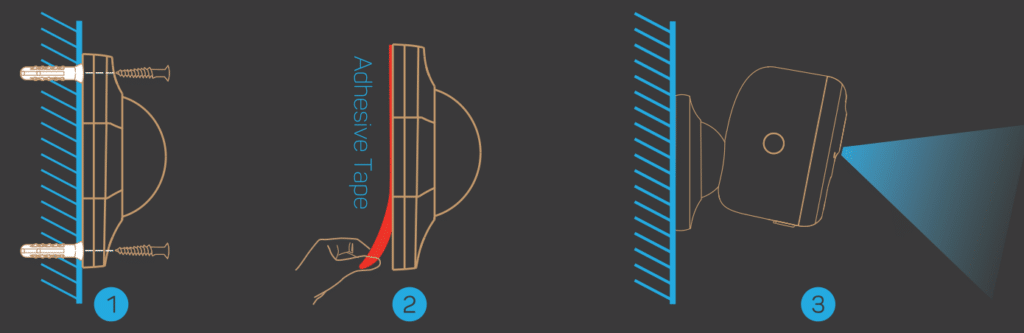
Mounting the Camera:
- Wall Mount with Screws: Nail the screw to the wall with the provided anchors or directly to the wall until the bracket is fixed securely.
- Alternative Wall Mount: You can also use the provided double-sided tape instead of screws to fix the wall mount on a flat surface.
- Adjusting the Camera: Attach the camera to the bracket and adjust the angle to cover the surveillance area. Ensure the camera is within the Wi-Fi range.
Important Charging and Maintenance Notes:
- Battery Reminder: The Vichome App will remind you to charge your camera when the battery is low. Please use the provided Micro USB cable and a DC 5V 1.5A phone charger. During charging, the camera’s LED indicator will turn solid yellow and, once fully charged, to solid green. It takes about 8-10 hours to fully charge your camera.
- Firmware Updates: When you connect your camera through the Vichome App, it will notify you if the latest firmware is available. You can also manually check for firmware updates in the app settings.
- Before Firmware Update: Please ensure your camera is fully charged or connected to a power source to upgrade the firmware. Do not cut off the power during the upgrade.
Technical Parameters Overview
Video & Audio Features:
- Image Sensor: 1/3″ CMOS (2.0MP)
- Resolution: Hi3518E V300
- Image Sensor Resolution: 1920 x 1080 px
- Stream: HD/SD dual stream
- Infrared LED: High power IR LED with ICR
- Lens: 2.8mm/F2.0
- Angle of View: 110°
- Minimum Illumination: Color: 0.01 Lux; B&W: 0.01 Lux
- Audio Capabilities: 2-way audio with noise cancellation
Storage Options:
- Storage Type: Micro SD Card (Max 128GB)
- Cloud Storage: Supported
- Recording Activation: Triggered by PIR motion sensor
Network Specifications:
- Wi-Fi Frequency: 2.4 GHz ~ 2.4835 GHz
- Wi-Fi Standards: IEEE 802.11 b/g/n
- Live View Speed: Within 3 ~ 4 seconds
Software Integration:
- App Name: VicoHome
- Compatible Systems: iOS, Android
- Remote View Response: Within 2 ~ 4 seconds
- Notifications: Push notification within 2 ~ 4 seconds
General Device Information:
- Standby Current: 300µA
- Working Current (Day): 250mA
- Working Current (Night): 510mA
- Battery Life on Full Charge: 2-3 Months
- Battery Charging Specification: DC5V 1A~2A (Micro USB Port)
- Firmware Upgrade Option: OTA (Over-the-Air)
- Dimensions: 72.1mm x 63.3mm x 97.4mm
- Weight: 0.35 KG
- Operating Temperature and Humidity: -20°C ~ 50°C; <90% (No condensation)
- Power Source: Lithium 21700 Battery (3.7V, 4800mAh x 2)
Bracket Data:
- Bracket Weight: 0.08 KG
- Bracket Dimensions: 86mm x 56mm x 28mm
Frequently Asked Questions (FAQ)
Q1: How to invite family and friends to use my camera together?
A1: Please refer to the guiding steps on page 7 of this user guide.
Q2: Why doesn’t the Wi-Fi name appear when I connect to Wi-Fi?
A2: On Apple devices with iOS 13 and above, you need to turn on the “location permission” for the app in the system settings and change it to “allow when using.”
Q3: Will the camera show red lights when night vision is activated?
A3: The built-in infrared lamp beads make the camera only show some dim red lights when night vision is activated, but the image quality is still clear under no light environment.
Q4: What are the requirements for Wi-Fi?
A4: Please use a 2.4GHz wireless network. The device does not support the 5GHz wireless network. Meanwhile, set the Wi-Fi authentication method to wpa2-psk or other lower level of security method. A password is required.
Q5: How far should the camera be placed from the router?
A5: After testing, the Wi-Fi connection distance can normally reach up to 150 meters in the open area. However, the actual situation depends on the strength of Wi-Fi and its surrounding environment.
Q6: What is the maximum length of recording time?
A6: You can choose the recording time in the app. The camera can record for a fixed time or “auto” mode, depending on whether there is a person. The maximum length of a video is 3 minutes.
Q7: How to quickly view videos by category?
A7: Click the icon in the upper left corner of the “Library” page to start the search filters. Select the search settings and then click save to view the video playback.
Q8: What should I do when the device is in malfunction?
A8: Long press the power button to restart the camera. If there is no response, you can open the back shell of the camera, then open the rubber plug on the side then press the reset button with a pointed object to force the power off, then long press the power button to restart the camera.
This FAQ section provides answers to common queries and issues users may have with the device, ensuring they have the necessary information for troubleshooting and optimal usage.