What’s included
What’s Included:
- Doorbell
- Flat mounting bracket
- 3M tape
- Doorbell chime
- USB cable
- Wall screw (wall anchor)
- Wedge screw
- Removal pin

Note: Micro SD card and power adapter are not included
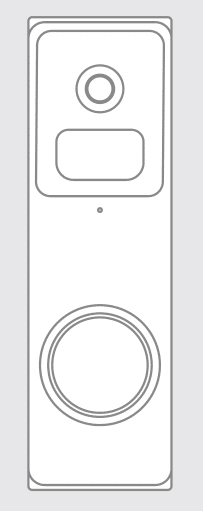
Get to know your doorbell
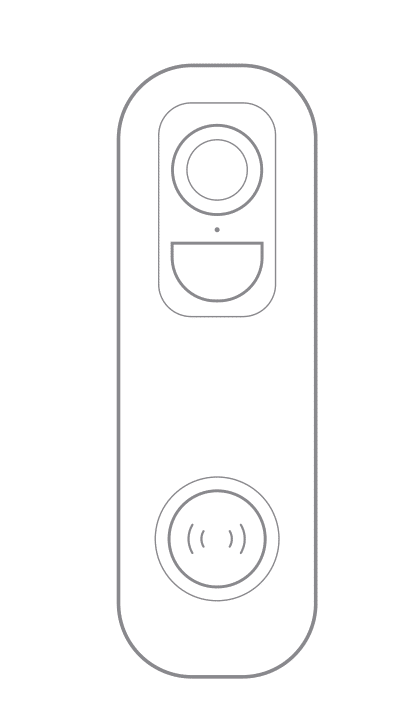
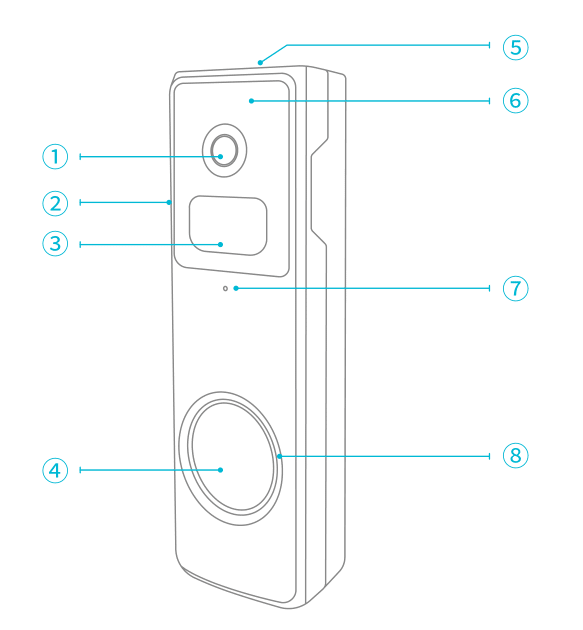
Doorbell front view
Doorbell Front View
- Lens
- Speaker
- Human body infrared sensor
- Doorbell button
- Removal hole
- Infrared light
- Microphone
- Indicator light
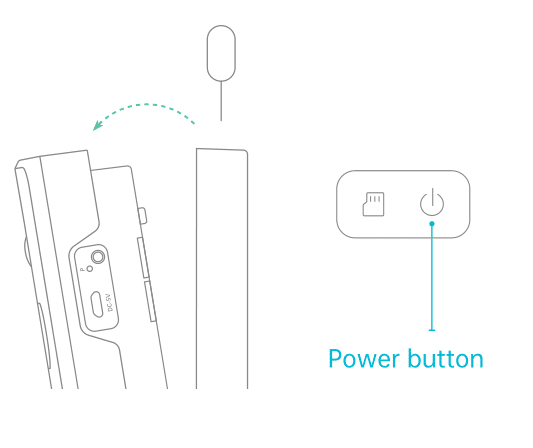
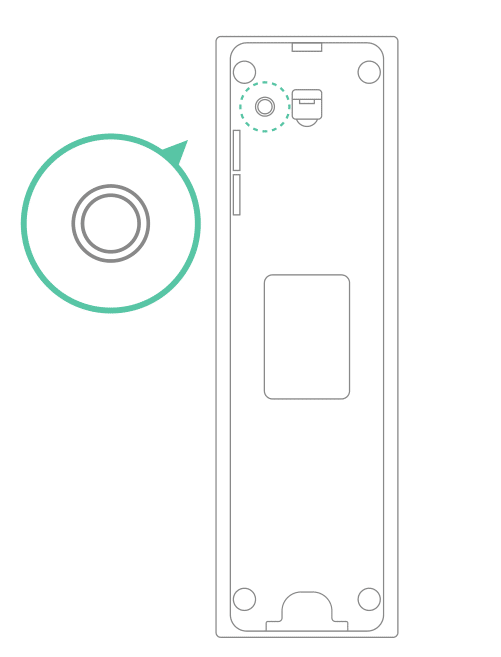
Functional views

- Reboot hole
- Micro-USB port
- Power button
- Micro-SD card slot
Chime views

- Indicator light
- Ringtone selection key / “SYNC” key
- Speaker
- USB port
Set up your doorbell
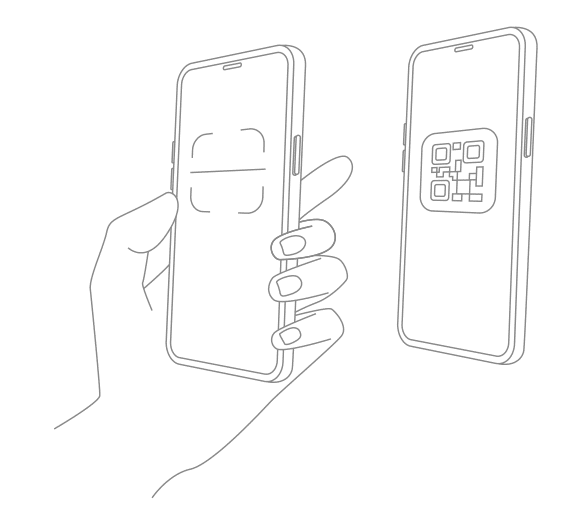
Downloading and Installing the App
The doorbell can be connected to and operated through smartphones running on Android and iOS platforms. For your best experience, please scan the QR code below, download and install the latest version app, and follow the prompts to complete user registration.

Doorbell binding
- Click the “Add Now” button in the app, press and hold the doorbell switch button for 3 seconds to turn on the doorbell, and the app will automatically search for devices that are on and not bound. Select the device you want to bind in the search results for the next step.
- Enter the name and password of the Wi-Fi network you want the doorbell to connect to. Click “Next” after completion, and the app will try to connect the doorbell to the Wi-Fi.
Note: To ensure a long-distance connection, the doorbell only supports a 2.4 GHz Wi-Fi network with stronger wall penetration capability and does not support Wi-Fi with enterprise-level authentication. Please make sure that your Wi-Fi meets the requirements.

3. After a while, the doorbell will play a sound indicating that the connection is successful. At this point, please set a name for the doorbell on the app and select the location where you want to place the doorbell. Click Finish to complete the pairing.
Possible Problems with Binding
- When you hear “Password error”: Check if the Wi-Fi password you entered in the app is correct.
- When you hear “Authentication method error”: Please make sure that your Wi-Fi network is not in an enterprise-level network connection mode, as the doorbell only supports networks with a security level below WPA-2.
- When you hear “AP does not exist”: Please check if you have selected or entered the correct Wi-Fi name. Place the doorbell near the Wi-Fi router and make sure the router is powered on. Also, please note that 5 GHz Wi-Fi cannot be searched by the doorbell either.
- When you hear “IP acquisition timeout”: It means that you have too many devices connected to the router. To connect more devices, please delete some infrequently used devices or reboot the router to clear the unconnected doorbell whose lease has expired, and you may need to contact the router administrator.
- When you hear “Server connection failed”: Please check if your router is properly connected to the external network. This is usually the case when your home network is disconnected or the router you choose is a server on the LAN. Please make sure the network connection is normal, and try to connect again by temporarily turning off the firewall.
Doorbell Sharing
You can use this feature when you need to use the doorbell with other family members or friends. Only the admin user who has bound the doorbell for the first time can share and set up the doorbell, while other members can only view the live video or video playback feature of the doorbell.
- For the admin user of the doorbell, find the doorbell you wish to share on the app homepage or doorbell settings screen, then click the share button and enter the Share page. Click “Device Sharing” to generate a shared QR code.
- For users who need to be shared with, click “+” on the homepage and select “Add Friend’s Device” to enter the scan code page.
- After the shared user successfully scans the QR code on the admin user’s mobile phone, the admin user will receive a confirmation notification, then click “Accept” to complete the doorbell sharing.
Power On/Off & Network Configuration
The power button can control the doorbell on/off function or enter the network configuration mode. You need to first remove the doorbell from the bracket before the button can be pressed.
- Insert and press the detaching pin into the hole on the top of the doorbell and then lift to take the top of the doorbell off.
- Press and hold the power button for 3 seconds to switch the device on and off.
- Double-click the power button on the doorbell that has been powered on and a prompt tone will sound indicating to enter the network configuration mode.
Connecting the Chime
- Connecting the doorbell chime with a charger, connect the doorbell chime to the power supply of 5V/1A~5V/2A, and the doorbell chime will ring once.
- Bring your doorbell close to the chime. Move the doorbell within 2 meters of the doorbell chime so that the doorbell and the doorbell chime can be paired stably.
- When you put the doorbell, chime into sync state, press and hold the pairing button on the front of the indoor Ding Dong until you hear a beep.
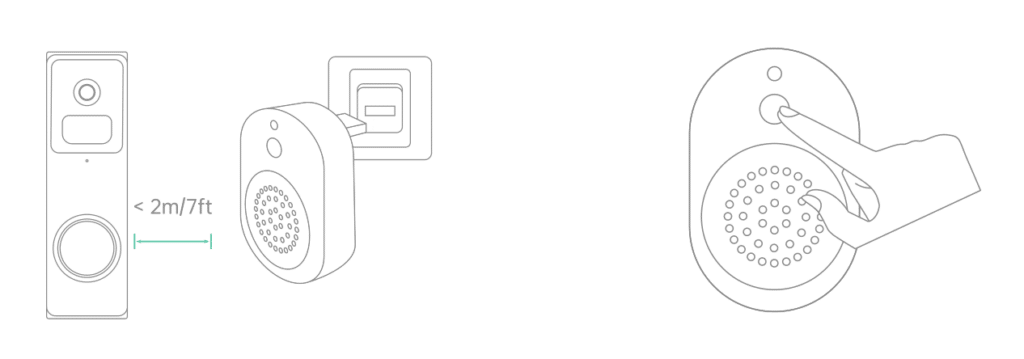
- Synchronizing the doorbell with the chimePress and hold the doorbell button for 6 seconds, the doorbell will ring twice, send a connection signal, and the doorbell chime will ring.
- Connection SuccessfulPress the doorbell button for testing. When a chime rings, it indicates that the connection is successful.

Note:
- Your doorbell communicates with the chime via Radio Frequency, but not Wi-Fi.
- You can assign different chimes as needed.
- If you want to cancel the pairing relationship, you can long press the indoor Dingdong synchronization button for 8s.
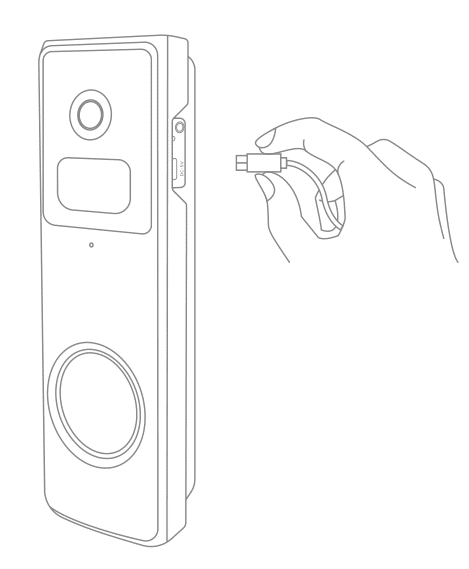
Charging Your Doorbell
Before the doorbell installation, please charge your doorbell. During the charging process, the yellow indicator light of the doorbell is always on, and then it will become solid green when the charging is completed. It may take about 10 hours to fully charge the doorbell.
Note:
- Compatible charger (not included)
- USB-compatible mobile phone charger (DC 5V 1A~2A)
Installation
Choose the right place to install
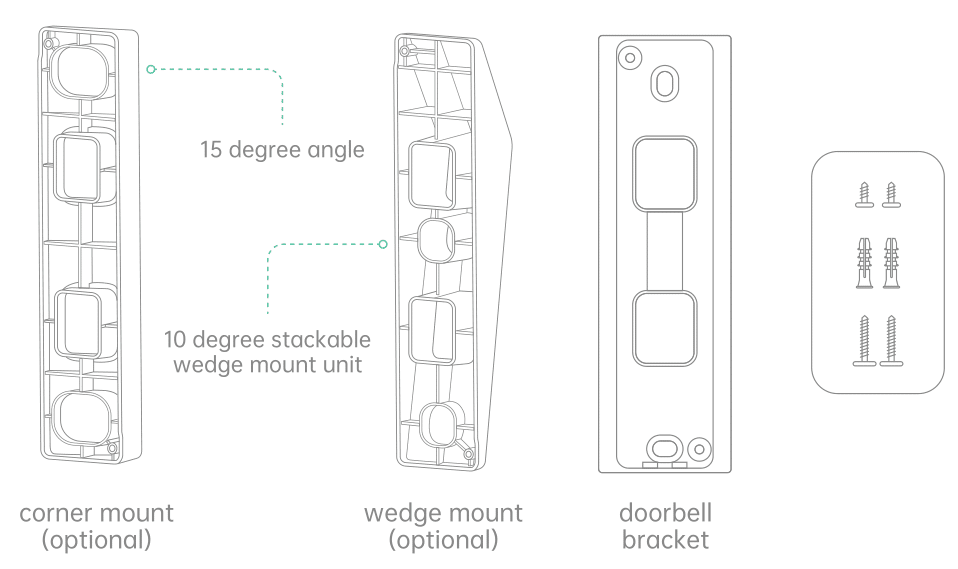
You need
- The items in the Smart Video Doorbell box
- Phillips screwdriver
- (Optional) power drill
- Select a location for your video doorbell.Determine the mounting position of the doorbell. Check if you can reuse the existing holes on the wall if you don’t want to drill new holes to mount your video doorbell.It is suggested to mount the doorbell at least 5 feet (150 cm) above the ground for the optimal angle of view and best motion detection performance.

Note:

- The doorbell, indoor unit, and router need to be as close as possible (to avoid networking failure due to distance).
- The doorbell should be installed on non-metallic porches and walls (to avoid signal shielding) or affixed to the wall on the door side.
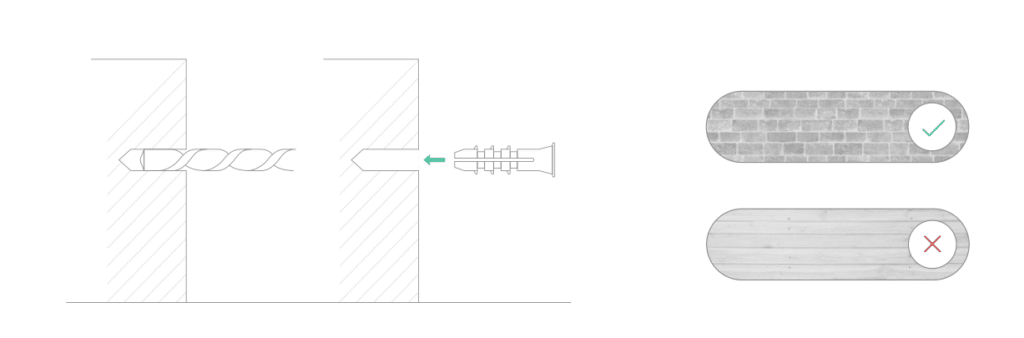
2) If installing on stucco, brick, or concrete, mark 2 drill holes using the doorbell bracket as a template. Then, use a 1/4″ masonry drill bit to drill holes in your wall, and insert the included anchors. (If you’re installing on a wood surface, skip this step.)
mounting order

Wireless Installation
- Release the bracket from the doorbell with the provided tool.
- Mark the screw holes and mount the bracket on your wall with screws.

3) Adhesive tape is provided to mount the bracket on flat surfaces. (Optional)

Note:
When mounting the doorbell with 3M adhesive pad, in order to improve the adhesive pad’s adhesive effect, please wipe the mounting location to ensure that there is no dirt and dust. When the 3M adhesive pad is attached to the wall, you need to press evenly up and down to ensure that the adhesive pad is fully activated.
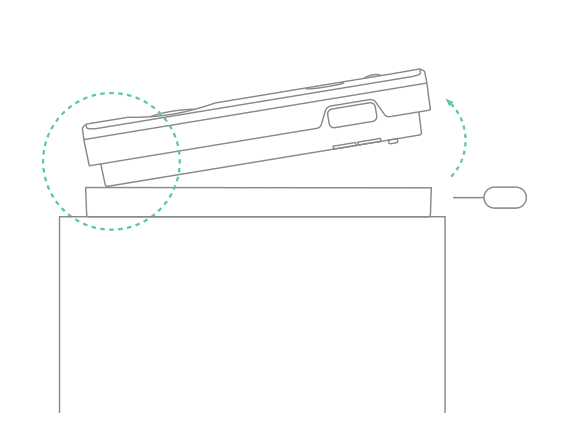
4) Attach the doorbell to the fixed mounting bracket.
5) All set! Press the doorbell button to run a test.

Install at an Angle (Optional)
You can purchase the following angled brackets to point your doorbell to a specific view angle.
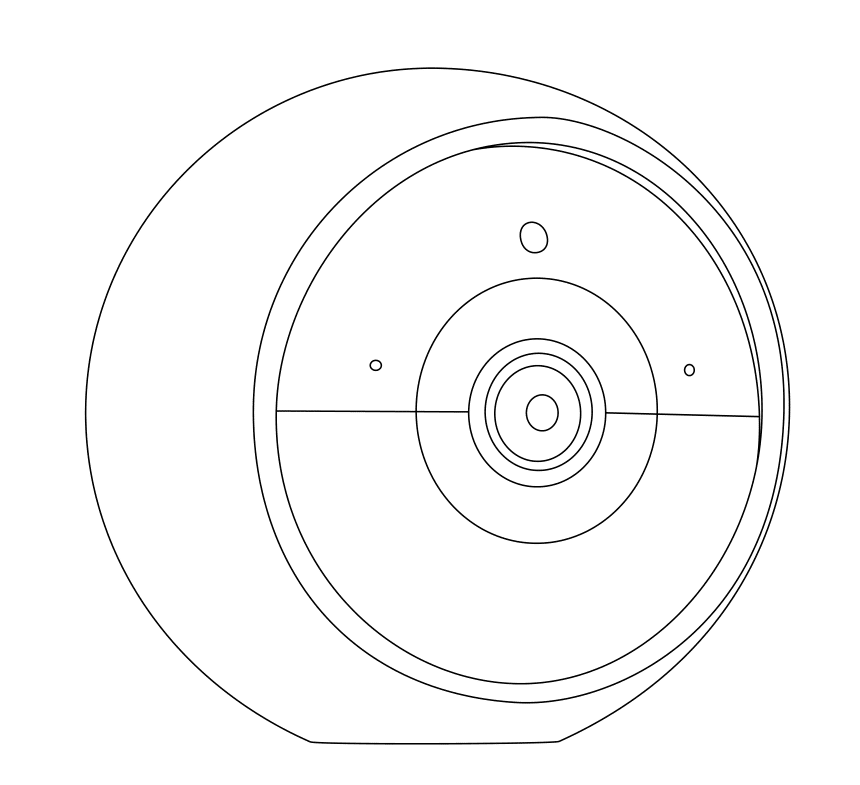
Doorbell Bracket Rear View
Installation steps
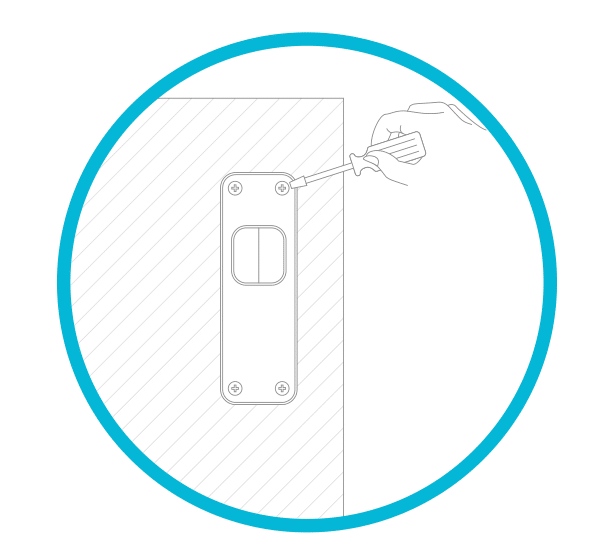
- If you have an existing doorbell, please remove it.
- Mark the screw holes and mount the angle bracket on your wall with screws.
- Mark the screw holes and mount the plane bracket on the angle bracket with screws.
- After fixing the screws, the installation is completed.
schematic diagram

Detach and Alarm
- Anti-theft Tamper AlarmYou can also enable the anti-theft alarm in doorbell settings.
- Tamper Alarm OnWith the tamper alarm on, your doorbell detects dismounting activities with the button on its back, and then a 30-second siren alarm will be triggered. Meanwhile, video recording will start, and an alarm notification will be pushed to the owner’s app account.
- Tamper Alarm OffYou can disable the tamper alarm in doorbell settings, and detach the doorbell without triggering any alarm for battery recharge or regular maintenance.
Product specifications
LED Indicator Explanation
| Mode | Status |
|---|---|
| Working mode | Solid blue light |
| Sleep mode | Off |
| Charging mode | Solid yellow light |
| Charging completed | Solid green light |
| Network setting up mode | Flashing blue light |
Video Doorbell Specifications
| Item | Specification |
|---|---|
| Camera | 2M Camera |
| View angle | FOV 150 |
| Image resolution | 1920(H) x 1080(V) |
| Video bitrate | Adaptive |
| Storage medium | Micro SD card (up to 128 GB) |
| Battery capacity | 5000 mAh |
| Adapter requirements | 5 V/1.5 A |
| Dimension | 152×46×31 (mm) |
Wireless Chime Specifications
| Item | Specification |
|---|---|
| Power port | USB |
| Ringtone type | Chord music |
| Volume | 80db (Nonadjustable) |
| Communication protocol | OOK |
| Adapter requirements | 5V/1A or 1.5A |
| Dimension | 64×45×18 (mm) |
Firmware upgrade
When you connect your doorbell via the app, it will automatically detect if there is a new firmware available and prompt for an upgrade. You can also manually detect the firmware upgrade in the app’s doorbell settings.
Note: Please make sure your doorbell is fully charged or connected to the power adapter before the firmware upgrade, and do not turn off your doorbell during the upgrade process.
FAQ and Troubleshooting
Q: Does the doorbell glow red when using its night vision?
A: It has built-in infrared light beads. Only a faint red light can be seen under the night vision mode, and the camera is still clear in a dark environment.
Q: What are the requirements for Wi-Fi?
A: Please use a 2.4 GHz wireless network. The doorbell does not support the 5 GHz wireless network. Meanwhile, please set the Wi-Fi authentication method to a security method below wpa2-psk, which requires a password.
Q: How far away from the router should the doorbell be placed?
A: It has been tested that the Wi-Fi connection distance is up to 150 meters in an open environment. The actual situation depends on the Wi-Fi signal strength and the surrounding environment (too thick walls, electromagnetic wave doorbells, and large metal objects can interfere with the Wi-Fi signal). If the doorbell connection signal is weak or unstable, please place the doorbell as close to the router as possible.
Q: How can I review videos in a quick and categorized way?
A: Click the icon on the top left corner of the “Library” screen to set filtering conditions, check the conditions and save them to quickly review the video playback by category.
Q: What should I do when the doorbell acts abnormally?
A: After taking the doorbell off the bracket, press and hold the power button for 3 seconds to reboot it. If it doesn’t respond, you can reset the doorbell by poking the reset hole with a pin.