Once you add a camera to the app, you become the admin of the camera. If you want to add an additional user to watch the camera on multiple devices, let’s say you want to make another person (your family member or your friend) be able to access the camera on his or her phone, you can share your camera with that person. The shared user needs to download the app and register a new account first. Below are the sharing steps:
Face to Face Sharing
Step 1 Generate the shared QR code of the camera.
The camera admin taps the Share icon () on the live window on the homepage or tap the Share button on the Camera Setting page, then tap the Camera sharing button on the Share page to generate a share QR code of the camera.

Step 2 Scan the shared QR code using the shared user’s phone
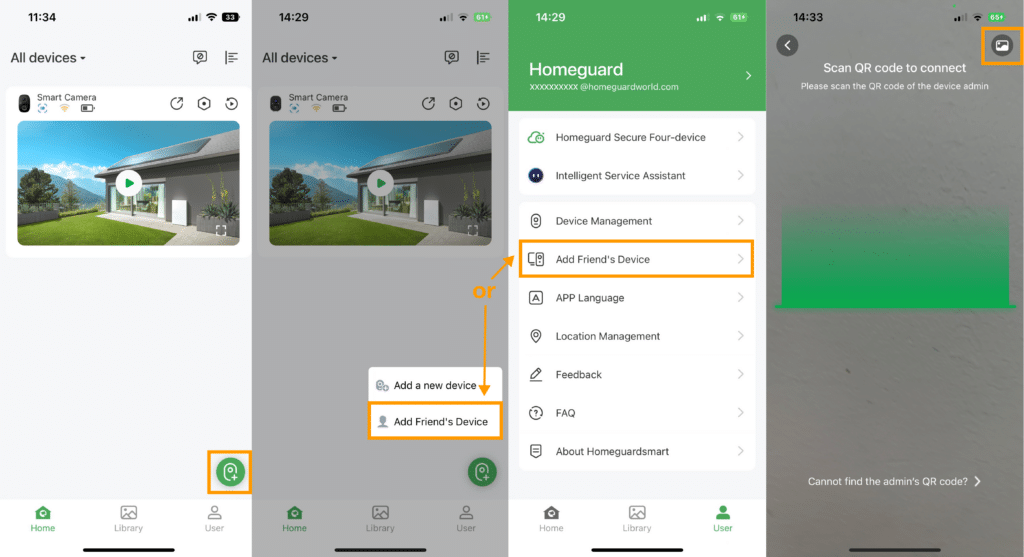
The shared user taps the + icon
On the top right of the homepage, tap the Add Friend’s Camera button. He/she can also directly tap the Add Friend’s Camera button from the User page. Then, scan the generated share QR code.

Step 3 Accept the camera access request.
After successfully scanning the shared QR code, the camera admin will receive a guest user request. Accept the guest user request, then the shared user will be able to see the camera on the homepage and access the camera. The Person icon indicates this is a shared camera. The camera admin can check the shared account on the Share page.

Remote Sharing
Step 1 Generate the shared QR code of the camera.
The camera admin taps the Share icon (share.PNG) on the live window on the homepage or taps the Share button on the Camera Setting page, then taps the Camera sharing button to generate a share QR code of the camera.
Step 2: The camera admin screenshots the shared QR code and then sends it to the shared user.
Step 3: The shared user saves the screenshot.
Step 4 Scan the screenshot of the shared QR code using the shared user’s phone.
The shared user taps the + icon on the top right of the homepage, then taps the Add Friend’s Camera button. He/she can also directly tap the Add Friend’s Camera button from the User page. Then tap the Picture icon on the top right and then choose the saved screenshot to scan.
Step 5 Accept the camera access request.
After successfully scanning the shared QR code, the camera admin will receive a guest user request. Accept the guest user request, then the shared user will be able to see the camera on the homepage and access the camera. The Person icon indicates this is a shared camera. The camera admin can check the shared account on the Share page.